使用 Deno 构建 Nuxt 应用
Nuxt 是一个基于 Vue 的直观框架, 提供了文件路由、多种渲染选项和开箱即用的自动代码拆分。凭借其模块化架构,Nuxt 通过提供结构化的开发方式简化了 Vue 应用的构建流程。
在本教程中,我们将使用 Deno 构建一个简单的 Nuxt 应用,显示恐龙列表,并允许你点击名字查看更多恐龙信息。
你可以在 GitHub 上查看完整示例。
也可以体验 Deno Deploy 上的在线示例。
想跳过教程,立即部署完整的 Nuxt 恐龙应用?点击下面按钮,瞬间将应用部署到 Deno Deploy。 你将获得一个可用的实时应用,可在学习时自由定制和修改!
使用 Deno 脚手架 Nuxt 应用 Jump to heading
通过 Deno 创建新的 Nuxt 项目:
deno -A npm:nuxi@latest init
选择创建项目的目录,并选择 deno 作为依赖管理方式。你也可以选择初始化 git 仓库,也可以之后再做。
然后进入新项目目录,运行 deno task 查看 Nuxt 可用任务:
cd nuxt-app
deno task
这会显示可用任务,如 dev、build 和 preview。dev 用于启动开发服务器。
启动开发服务器 Jump to heading
启动开发服务器:
deno task dev
这会启动 Nuxt 开发服务器,在浏览器访问 http://localhost:3000 查看默认 Nuxt 欢迎页面。
构建应用架构 Jump to heading
基础 Nuxt 应用搭建完成后,开始建立应用架构。我们创建几个目录以组织代码,并为后续功能做准备。项目内创建如下目录:
NUXT-APP/
├── pages/                 # Vue 页面
│   └── dinosaurs/         # 恐龙页面
├── public/                # 静态文件
├── server/                # 服务器端代码
│   └── api/               # API 路由
添加恐龙数据 Jump to heading
在 api 目录下创建 data.json 文件,用于存储硬编码的恐龙数据。
复制粘贴
此 JSON 文件
到 data.json 文件中。(实际应用中,通常从数据库或外部 API 获取数据。)
设置 API 路由 Jump to heading
应用将包含两个 API 路由,分别提供:
- 供索引页面使用的完整恐龙列表
- 单个恐龙页面的详细恐龙信息
路由均为 *.get.ts 文件,Nuxt 会自动根据文件生成响应 GET 请求的 API 端点。
文件命名决定 HTTP 方法及路由路径。
初始的 dinosaurs.get.ts 十分简单,使用 defineCachedEventHandler 创建缓存端点提升性能。该函数直接返回完整恐龙数据数组,无任何过滤:
import data from "./data.json" with { type: "json" };

export default defineCachedEventHandler(() => {
  return data;
});
单个恐龙的 GET 路由逻辑较多。它从事件上下文中取出名称参数,以不区分大小写方式匹配请求恐龙,缺少或错误时返回相应错误。我们创建 dinosaurs 文件夹,并新建 [name].get.ts:
import data from "../data.json";

export default defineCachedEventHandler((event) => {
  const name = getRouterParam(event, "name");

  if (!name) {
    throw createError({
      statusCode: 400,
      message: "未提供恐龙名称",
    });
  }

  const dinosaur = data.find(
    (dino) => dino.name.toLowerCase() === name.toLowerCase(),
  );

  if (!dinosaur) {
    throw createError({
      statusCode: 404,
      message: "未找到该恐龙",
    });
  }

  return dinosaur;
});
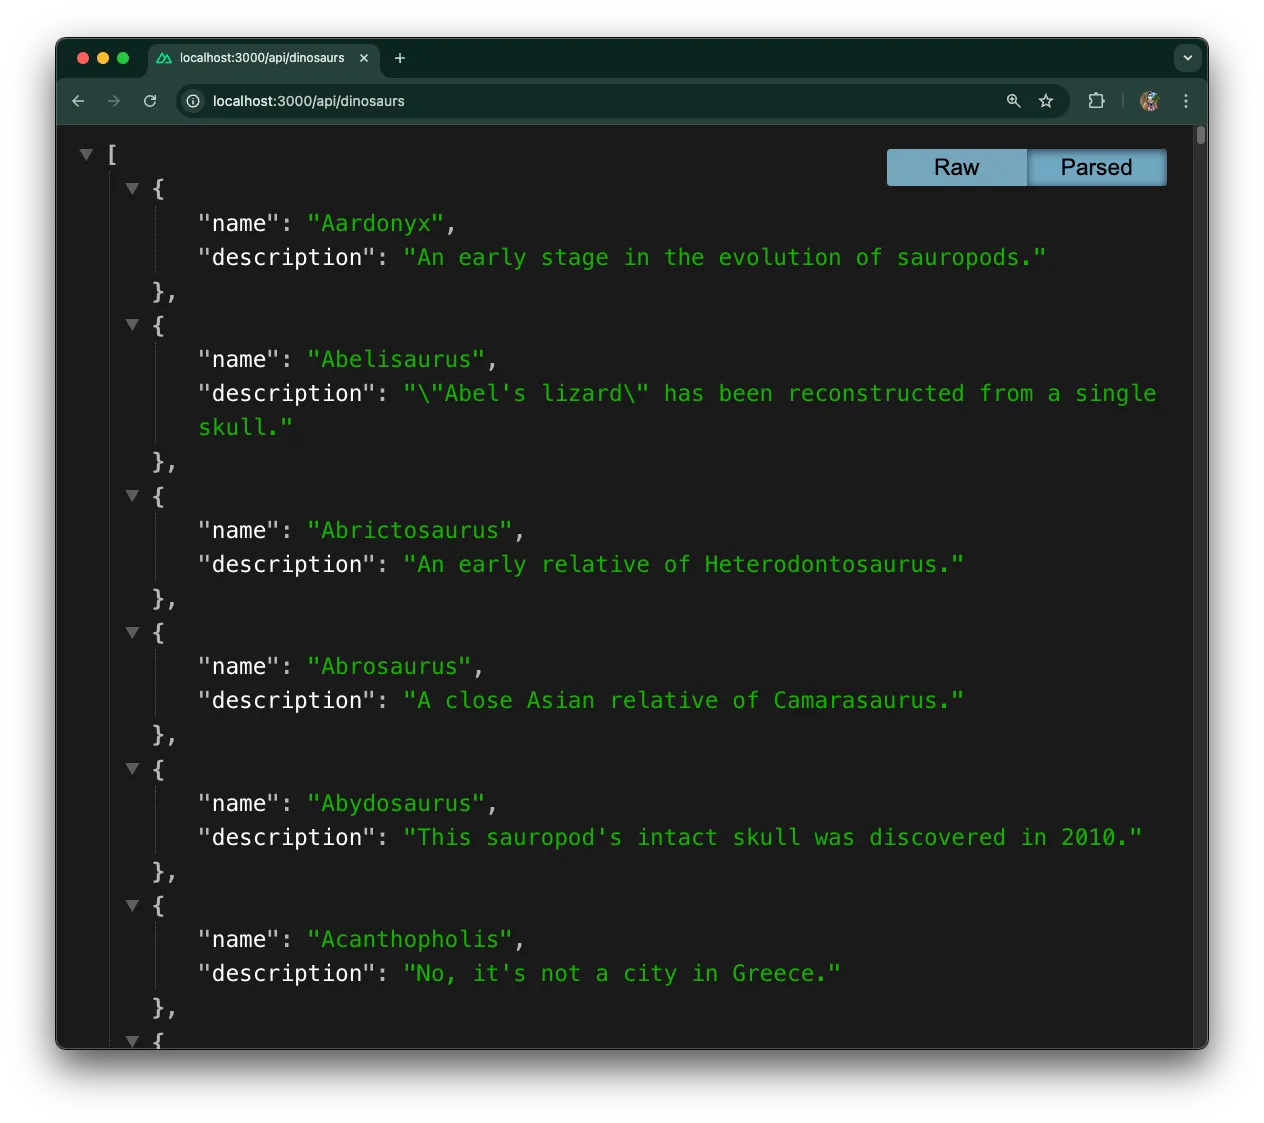
启动服务器 deno task dev,在浏览器访问
http://localhost:3000/api/dinosaurs,你应能看到包含所有恐龙的原始 JSON 响应!
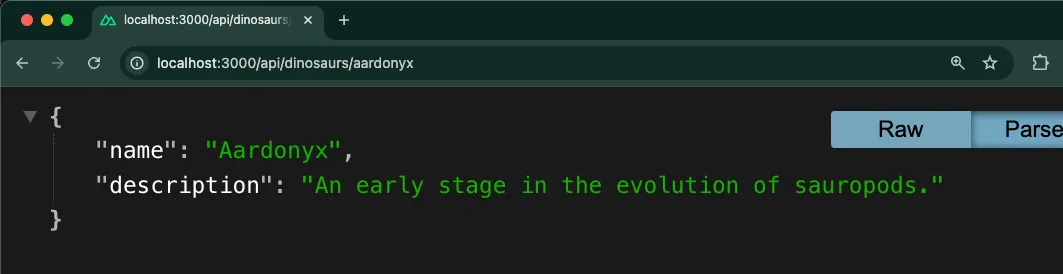
访问某个恐龙的特定 URL,如: http://localhost:3000/api/dinosaurs/aardonyx,查看单个恐龙数据。
接下来,设置 Vue 前端以显示索引页面和单个恐龙页面。
设置 Vue 前端 Jump to heading
我们需要两个页面:
- 一个索引页,列出全部恐龙
- 一个单独页,展示指定恐龙详情
首先,创建索引页面。Nuxt 使用
文件系统路由,我们在根目录创建 pages 文件夹,并新建 index.vue 作为索引页。
利用 useFetch 组合函数请求先前创建的 API 端点:
<script setup lang="ts">
const { data: dinosaurs } = await useFetch("/api/dinosaurs");
</script>

<template>
  <main id="content">
    <h1 class="text-2xl font-bold mb-4">Welcome to the Dinosaur app</h1>
    <p class="mb-4">Click on a dinosaur below to learn more.</p>
    <ul class="space-y-2">
      <li v-for="dinosaur in dinosaurs" :key="dinosaur.name">
        <NuxtLink
          :to="'/' + dinosaur.name.toLowerCase()"
          class="text-blue-600 hover:text-blue-800 hover:underline"
        >
          {{ dinosaur.name }}
        </NuxtLink>
      </li>
    </ul>
  </main>
</template>
然后,为显示单个恐龙信息,创建动态页面 [name].vue。该页面使用 Nuxt 的
动态路由参数,文件名中的 [name] 在 JavaScript 中通过 route.params.name 访问。我们用 useRoute 访问参数,并用 useFetch 根据名称获取指定恐龙数据:
<script setup lang="ts">
const route = useRoute();
const { data: dinosaur } = await useFetch(
  `/api/dinosaurs/${route.params.name}`
);
</script>

<template>
  <main v-if="dinosaur">
    <h1 class="text-2xl font-bold mb-4">{{ dinosaur.name }}</h1>
    <p class="mb-4">{{ dinosaur.description }}</p>
    <NuxtLink to="/" class="text-blue-600 hover:text-blue-800 hover:underline">
      返回所有恐龙
    </NuxtLink>
  </main>
</template>
接下来,将这些 Vue 组件串联起来,使访问根目录时能正确渲染。更新根目录的 app.vue,提供应用根组件。使用
NuxtLayout 保持一致结构,NuxtPage 用于动态页面渲染:
<template>
  <NuxtLayout>
    <div>
      <nav class="p-4 bg-gray-100">
        <NuxtLink to="/" class="text-blue-600 hover:text-blue-800">
          恐龙百科全书
        </NuxtLink>
      </nav>

      <div class="container mx-auto p-4">
        <NuxtPage />
      </div>
    </div>
  </NuxtLayout>
</template>;
运行 deno task dev,在 http://localhost:3000 查看效果:
效果很棒!
deno install -D npm:tailwindcss npm:@tailwindcss/vite
随后,更新 nuxt.config.ts。导入 Tailwind 依赖并配置 Nuxt 应用以支持 Deno,启用开发工具,设置 Tailwind CSS:
import tailwindcss from "@tailwindcss/vite";

export default defineNuxtConfig({
  compatibilityDate: "2025-05-15",
  devtools: { enabled: true },
  nitro: {
    preset: "deno",
  },
  app: {
    head: {
      title: "恐龙百科全书",
    },
  },
  css: ["~/assets/css/main.css"],
  vite: {
    plugins: [
      tailwindcss(),
    ],
  },
});
然后,创建新的 CSS 文件 assets/css/main.css,添加导入语句引入 tailwind 及其实用类:
@import "tailwindcss";

@tailwind base;
@tailwind components;
@tailwind utilities;
运行应用 Jump to heading
最后,通过以下命令运行应用:
deno task dev
应用将在 localhost:3000 启动:
完成了!
🦕 Nuxt 应用的下一步可以是使用 Nuxt Auth 模块添加认证,集成 Pinia 状态管理,添加服务器端数据持久化(例如 Prisma 或 MongoDB),以及搭建 Vitest 自动化测试,这些都将使应用更适合生产环境和大型项目。